


TUTO DIY Storage Box
The arrival of sunny days often makes you want to start a big spring cleaning and declutter your home to start this new season with peace of mind! In this new article, I therefore offer you a tutorial to learn how to beautifully dress a storage box with Japanese paper. This will be perfect for storing your belongings while adding a colorful touch to your decoration.

To personalize a Japanese paper storage box, you will need:
- a storage box from your choice of our set of 2 large boxes, A4 format (available in store only) or our set of 3 small boxes, A5 format (available in store and on the e-shop),
-
Japanese paper (in the colors and patterns of your choice),
- Thanks to 1 half sheet , you can decorate 1 small A5 format box (you will therefore need 3 half sheets to cover the 3 small A5 format boxes in our set).
- Thanks to 1 large sheet , you will be able to decorate 1 large A4 format box (you will therefore need 2 large sheets to cover the 2 large A4 format boxes in our set). - a cutter or a pair of precision scissors depending on your preference,
- a cutting rule ,
- white vinyl glue ,
- a brush ,
- masking tape ,
- a pencil,
- a few sheets of paper which will serve as a support for the collage.
TIP: To optimize bonding, do not hesitate to have a small wet towel on hand to wipe your hands regularly.

- Take the cardboard boxes, flat, the lid and the bottom of your box.

- Separately mount the lid and bottom of your box using small pieces of masking tape.
- You get this.

- Now take your sheet of Japanese paper.
- First, place the bottom of your box in the center of your sheet of Japanese paper. Trace its outline.
- You obtain a first mark (in blue in the photo).
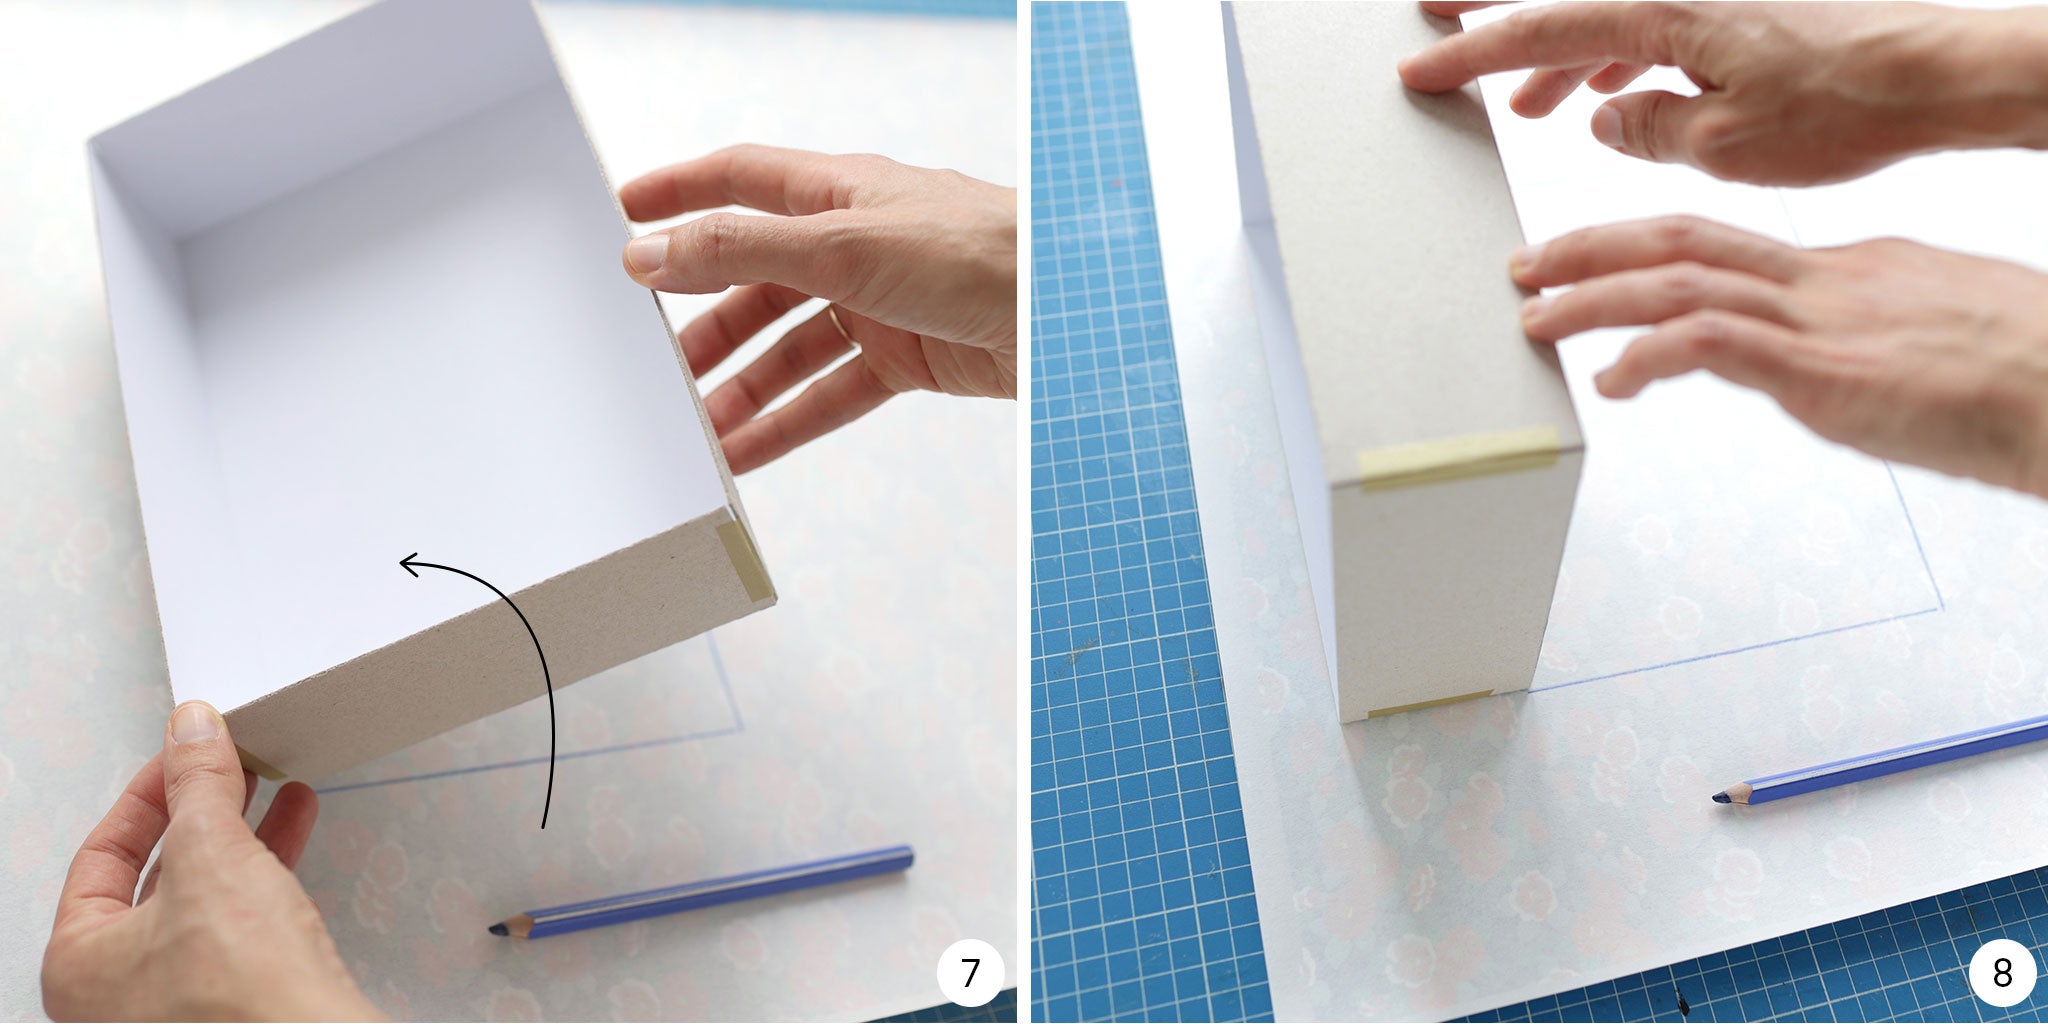
- Secondly, draw the marks on each edge of the box. To do this, tilt your box on its left side and draw a first mark (in blue in the photo).
- Repeat this operation for the other three edges (blue in the photo).

- You get this.
- Draw a 1cm margin all around the box marks, which corresponds to the fold of the Japanese paper inside the box (in red in the photo).

- Then trace the different cut-out marks for the corners of your box...
- ...as shown (in green in the photo).
- You get this.

- Repeat steps 6 through 13 for your box lid.
- You get this.
- Then cut out the templates for the bottom and lid of your box with a cutter.
- You get this.

- Then equip yourself with your templates, a few sheets of paper which will serve as a gluing support, a brush, and white glue.

- Place a little glue in the center of your lid template.
- Apply the glue evenly over the entire surface of your template using your brush, stretching it outwards.

- Carefully place the back of your lid on the glued surface, in the center of your template, respecting the mark drawn in step 6 for the bottom of the box and in step 15 for the lid of the box.
- Press firmly with your fingers to ensure that the Japanese paper and the cardboard cover adhere well.

- Then cut out the green marks drawn previously in steps 11/12 for the bottom of the box and in step 15 for the lid of the box...
- ...as shown (in green in the photo). Repeat for the other 4 angles.

- Then proceed to folding the Japanese paper inside the cover, respecting the order indicated in the photo.
- First, start by folding down one of the long edges...

- ...as shown in the photo. Do the same for the other long edge.
- Then fold down, on one of the short edges, the small wings that protrude. Do the same for the other short edge.

- Then fold the Japanese paper over one of the short edges...
- ... as shown in the photo and gently squeeze the glue to adhere to the cardboard.

- Then focus on the corners of your box lid.
- Cut them out, as shown in the photo, so that you can then fold them down in step 33.

- Then fold the corners, one by one, inside the lid.
- You get this. Repeat steps 18-33 for the bottom of your box.

TADA! Your storage box, decorated with Japanese paper, is finished! You can now store your papers, office supplies or even your little treasures there.
-------------------
I hope you enjoyed this article. Don’t hesitate to ask us your questions in the comments! We will be happy to answer them.
See you soon for new blog posts!
Warmly,
Adeline
-------------------
Did you know this technique?
What object would you like to learn to dress with Japanese paper?
Tell us more below in the comments!


Leave a comment