


Tanabata - The Star Festival
Summer and its warm, balmy evenings made me want to tell you about the lovely Japanese festival of the stars, Tanabata, and to offer you five quick and simple tutorials to learn how to make decorations typical of this celebration!

“The bamboo leaves crunch, crunch / Shake against the awnings / The stars sparkle, sparkle / Grains of sand of gold and silver. Five wishes / I wrote / The stars twinkle / And look down from the sky. »
笹の葉 さらさら - Bamboo leaves crunch
(traditional Tanabata song)
Of Chinese origin, this celebration is based on the love story of a mortal working as a herdsman, Hikoboshi (star of Altair in the Eagle constellation) and a weaver goddess, Orihime (star of Vega in the constellation Lyra).
Following their meeting, they end up falling in love with each other. Orihime then leaves the Celestial Kingdom to marry and start a family with Hikoboshi. But little by little, the two lovers abandon their respective tasks and are reprimanded by Orihime's father who decides to separate them. Faced with their distress, he finally gave in and granted them an annual meeting. Every year, on the seventh day of the seventh month, July 7, it is therefore permitted for the two lovers to cross the Milky Way ( amanogawa in Japanese) to find each other.
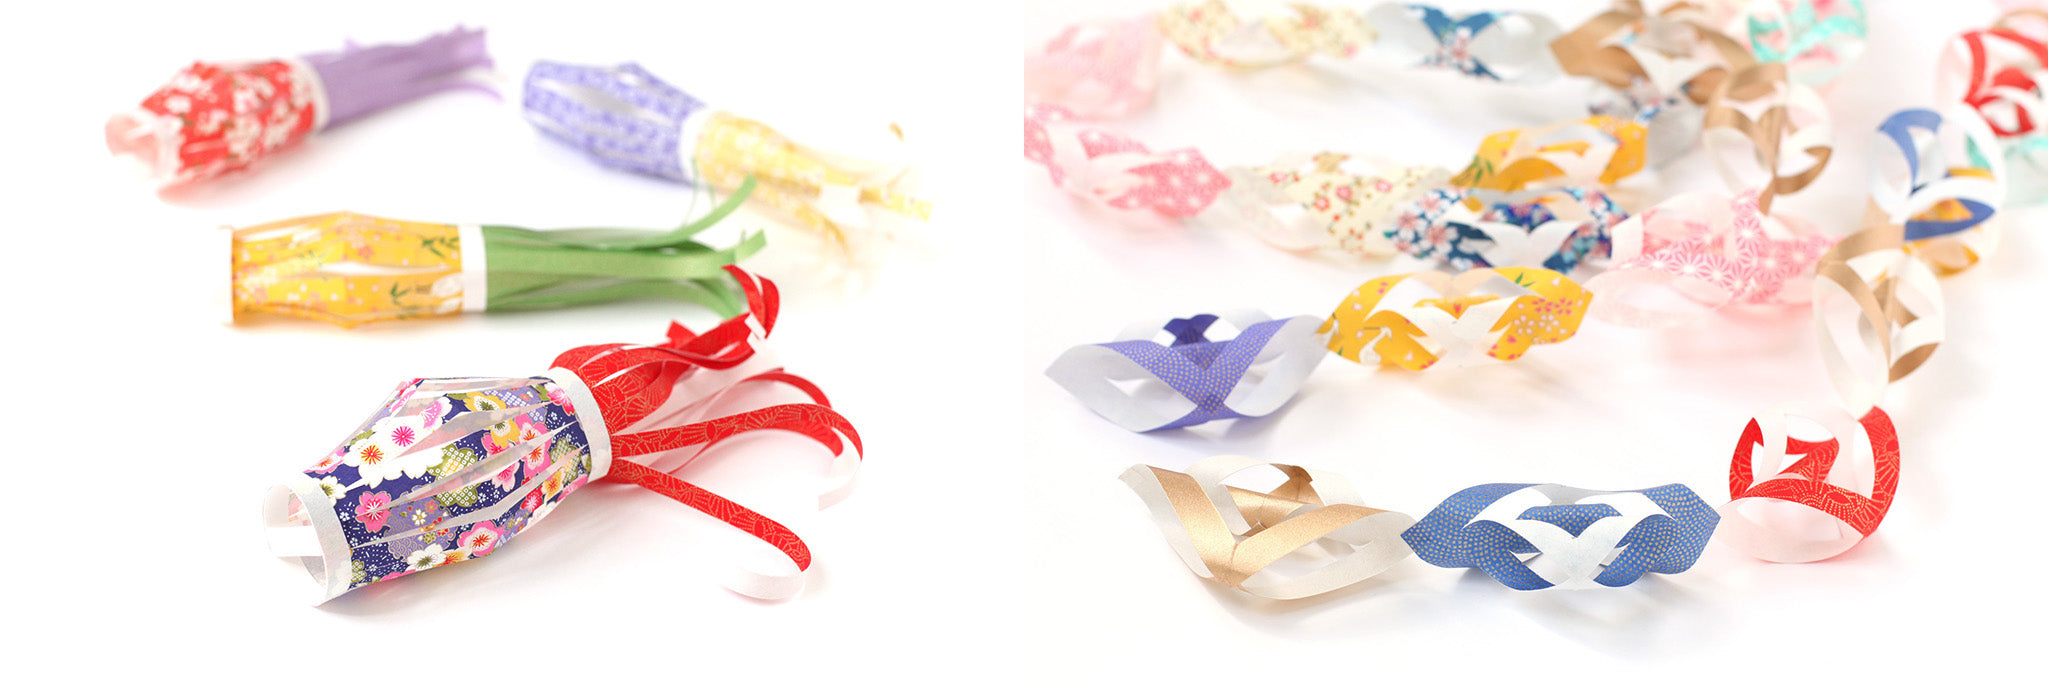
As you approach Tanabata, the towns are adorned with bright, shimmering colors! Using tanzaku , small vertical strips of colored paper, people are invited to formulate their dearest wish and then come and hang it on bamboos. Numerous paper decorations complete and brighten up the whole, notably the fukinagashi , these large tassels made up of a ball and strips, symbolizing the threads of Orihime's loom.
To celebrate the arrival of summer, we have prepared some DIYs for you to make paper decorations to make for example with the family on a sunny afternoon:
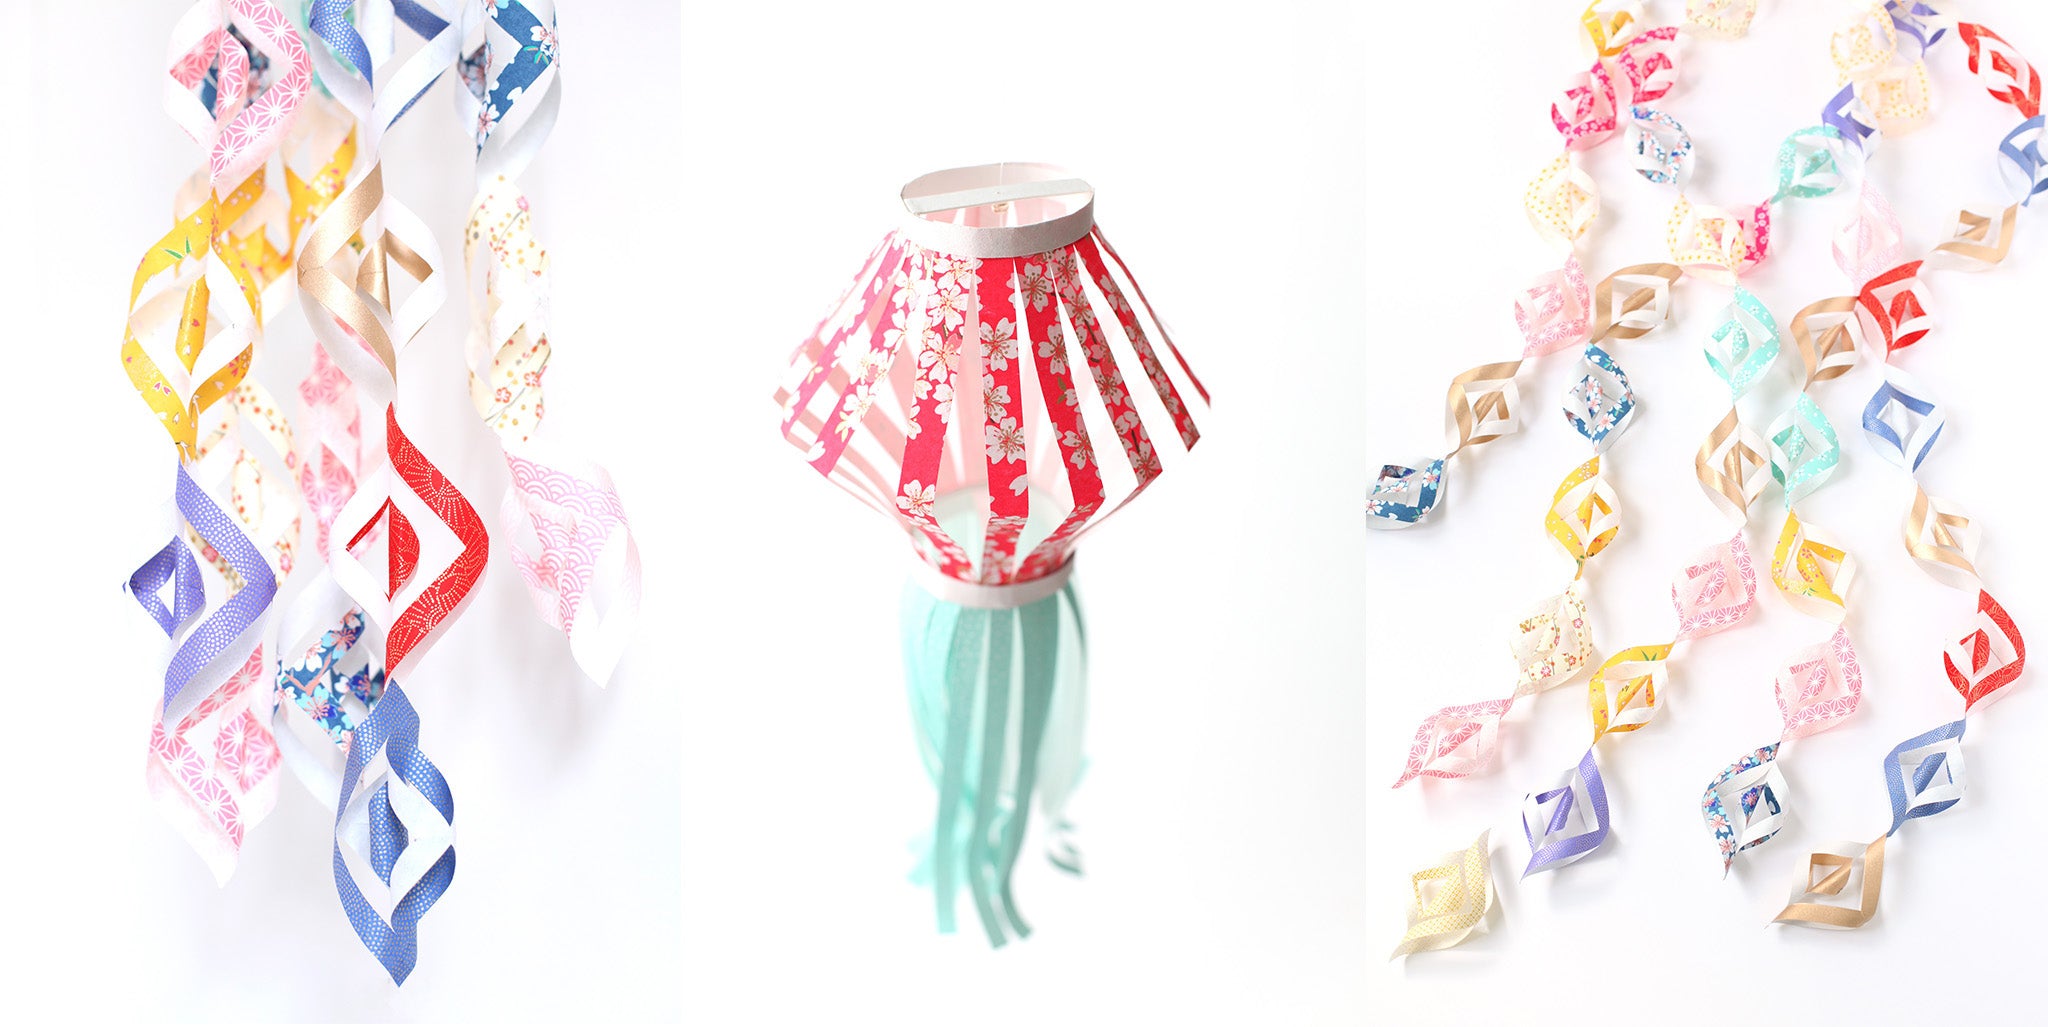
THE LANTERN / BONBORI - FUKINAGASHI

In order to make your origami Tanabata lantern, you will need:
- 2 squares of origami paper measuring 15cm on a side - For these Tanabata tutorials, you can use sets of origami paper measuring 15cm on a side in shimmering colors!
- a slightly stiff sheet of paper
- a little glue
- a pair of scissors or a cutter
-
a pencil
- a graduated ruler

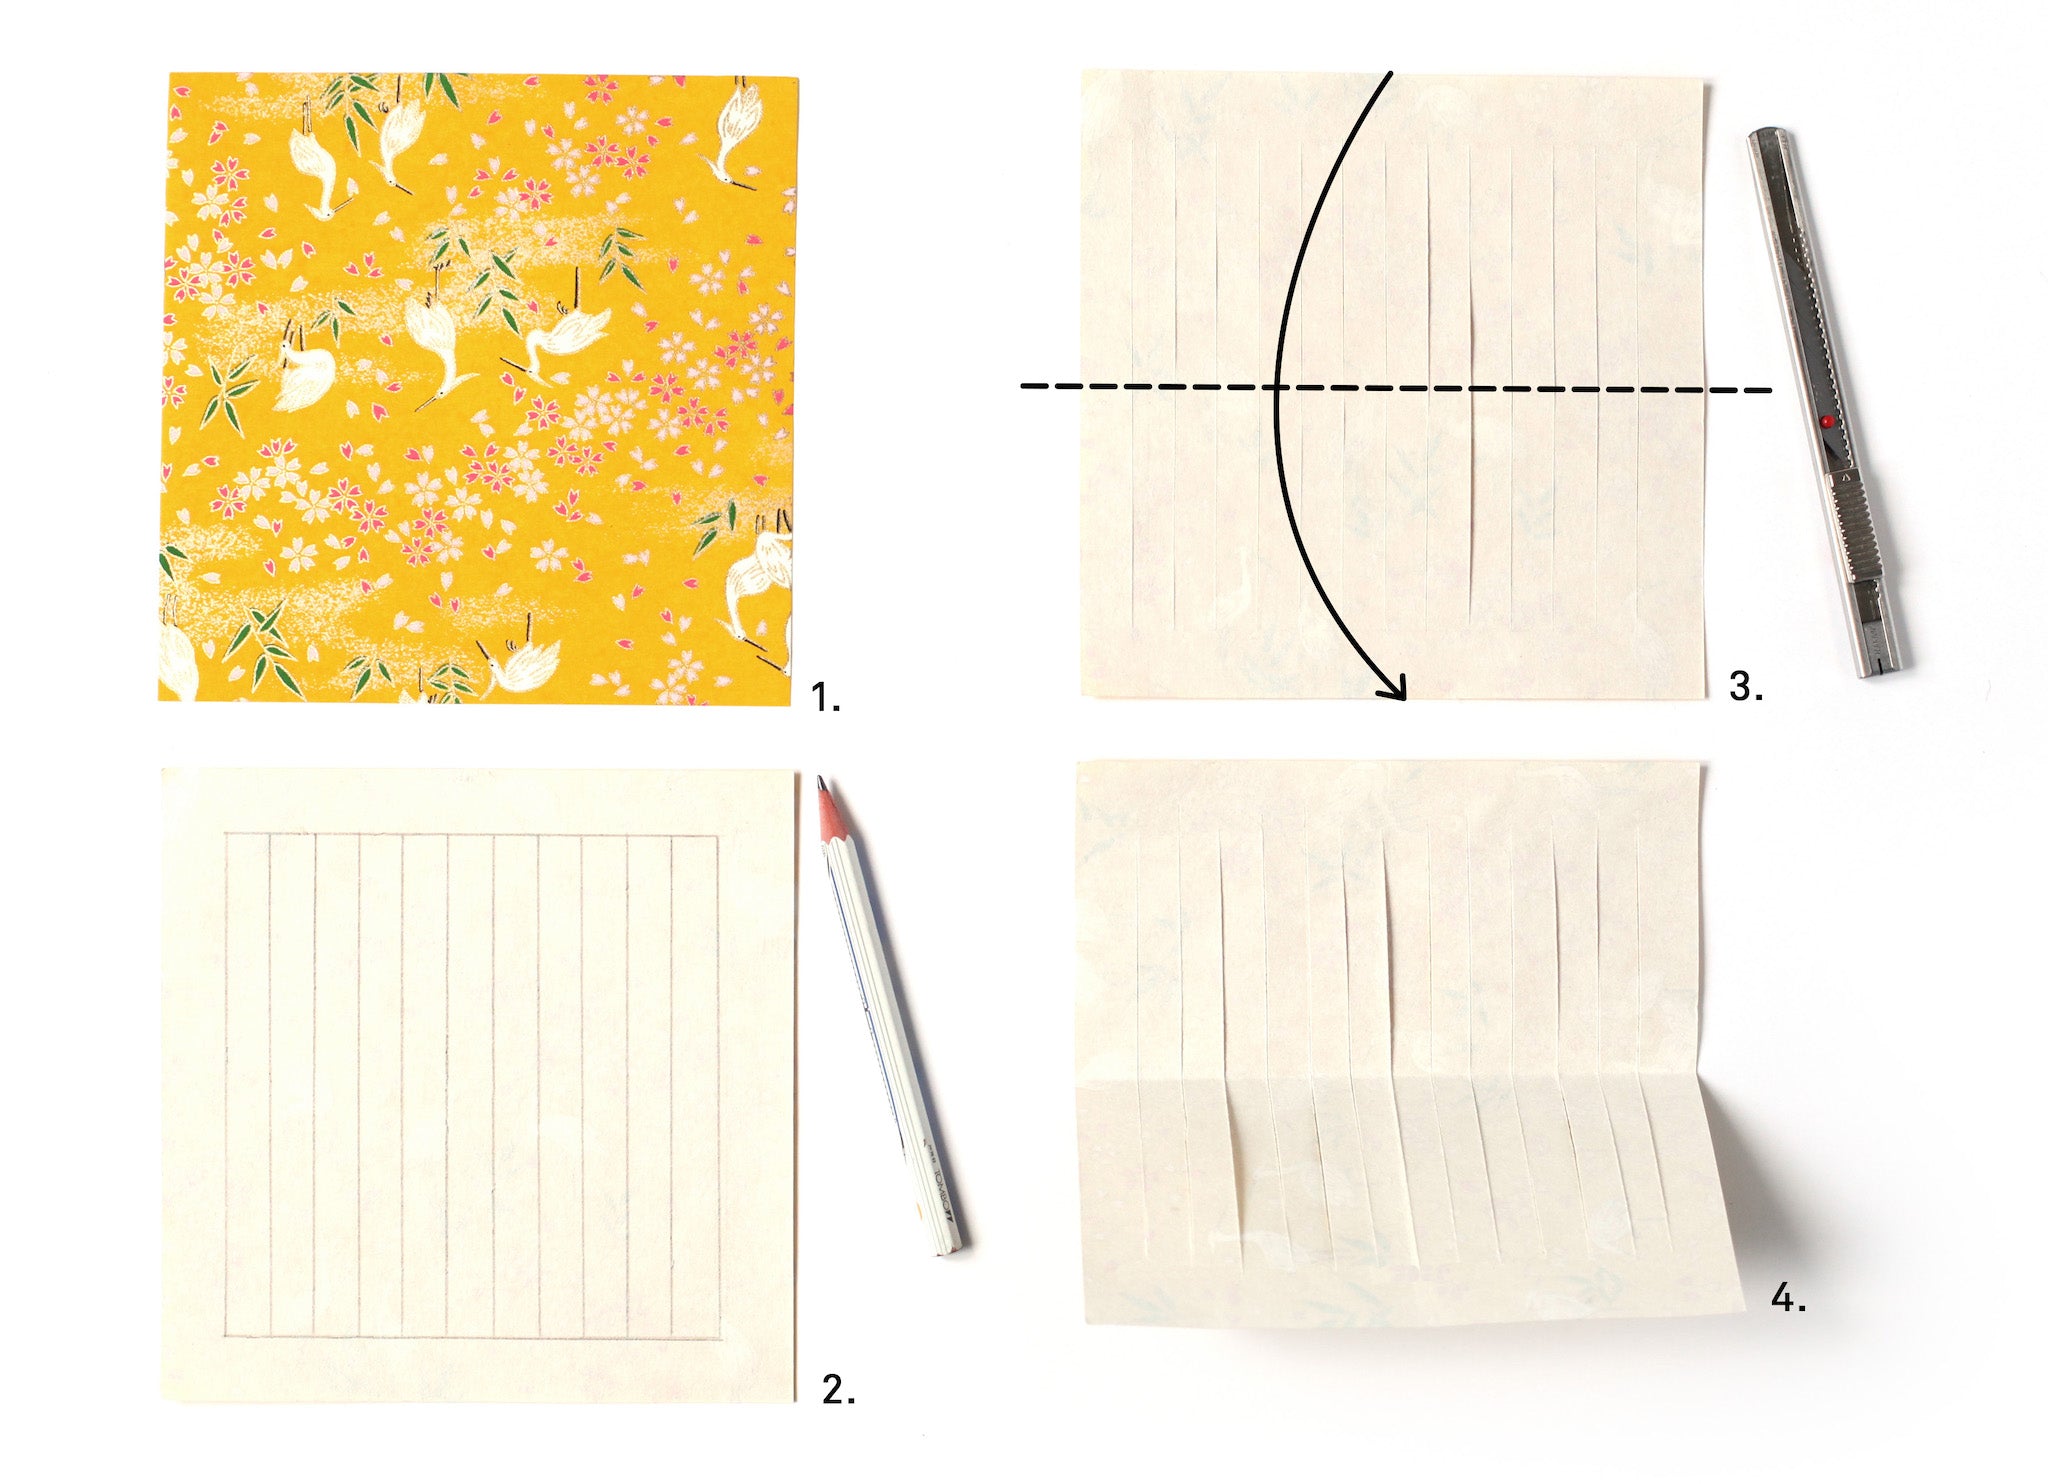
THE FRINGES (lower part)
- Take a 15cm square of Japanese paper.
- With the white side facing you, draw 14 lines every 1cm starting from the bottom of your square and stopping 1cm before the top of the square.
- Cut using a cutter or a pair of scissors along the lines drawn previously.

THE HEAD (upper part)
- Take another square of Japanese paper measuring 15cm on each side. With the patterned side facing you, fold your square horizontally.
- Draw 14 lines every 1cm starting from the bottom of your square and stopping 1cm before the edge.
- Cut using a cutter or a pair of scissors along the lines drawn previously.
- Fold the top and bottom of your square by 1cm. Mark the folds well.

ASSEMBLY
- Take your two parts made previously, patterned side towards you.
- Assemble them using glue.

ASSEMBLY
- Cut two strips of stiff paper 1cm wide and the length of your folds and glue them to the top of the lantern and to the joint between the two elements of the lantern.
- Fold the ends of your lantern and glue them together to build your lantern in volume. Prepare a third strip of stiff paper of a length equivalent to the diameter obtained for your lantern. Add 1cm to this length and fold the ends. Then slide and glue this strip to the top of your lantern. This will allow you to pass a wire through it while keeping it straight.

- You get this.
- TADA! Your lantern is finished!
--------------------
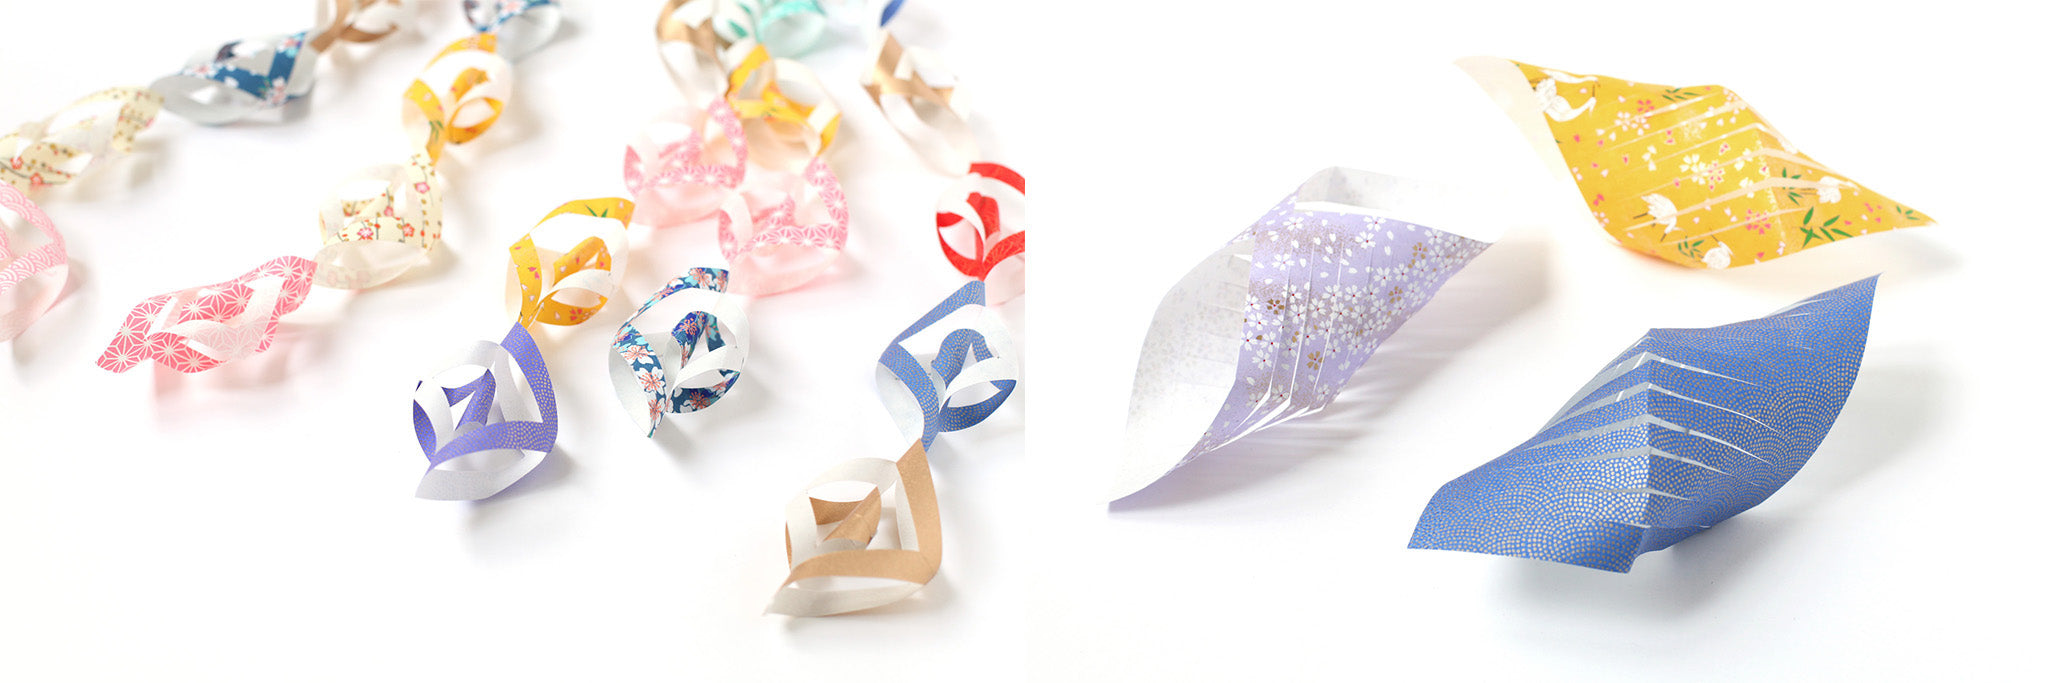
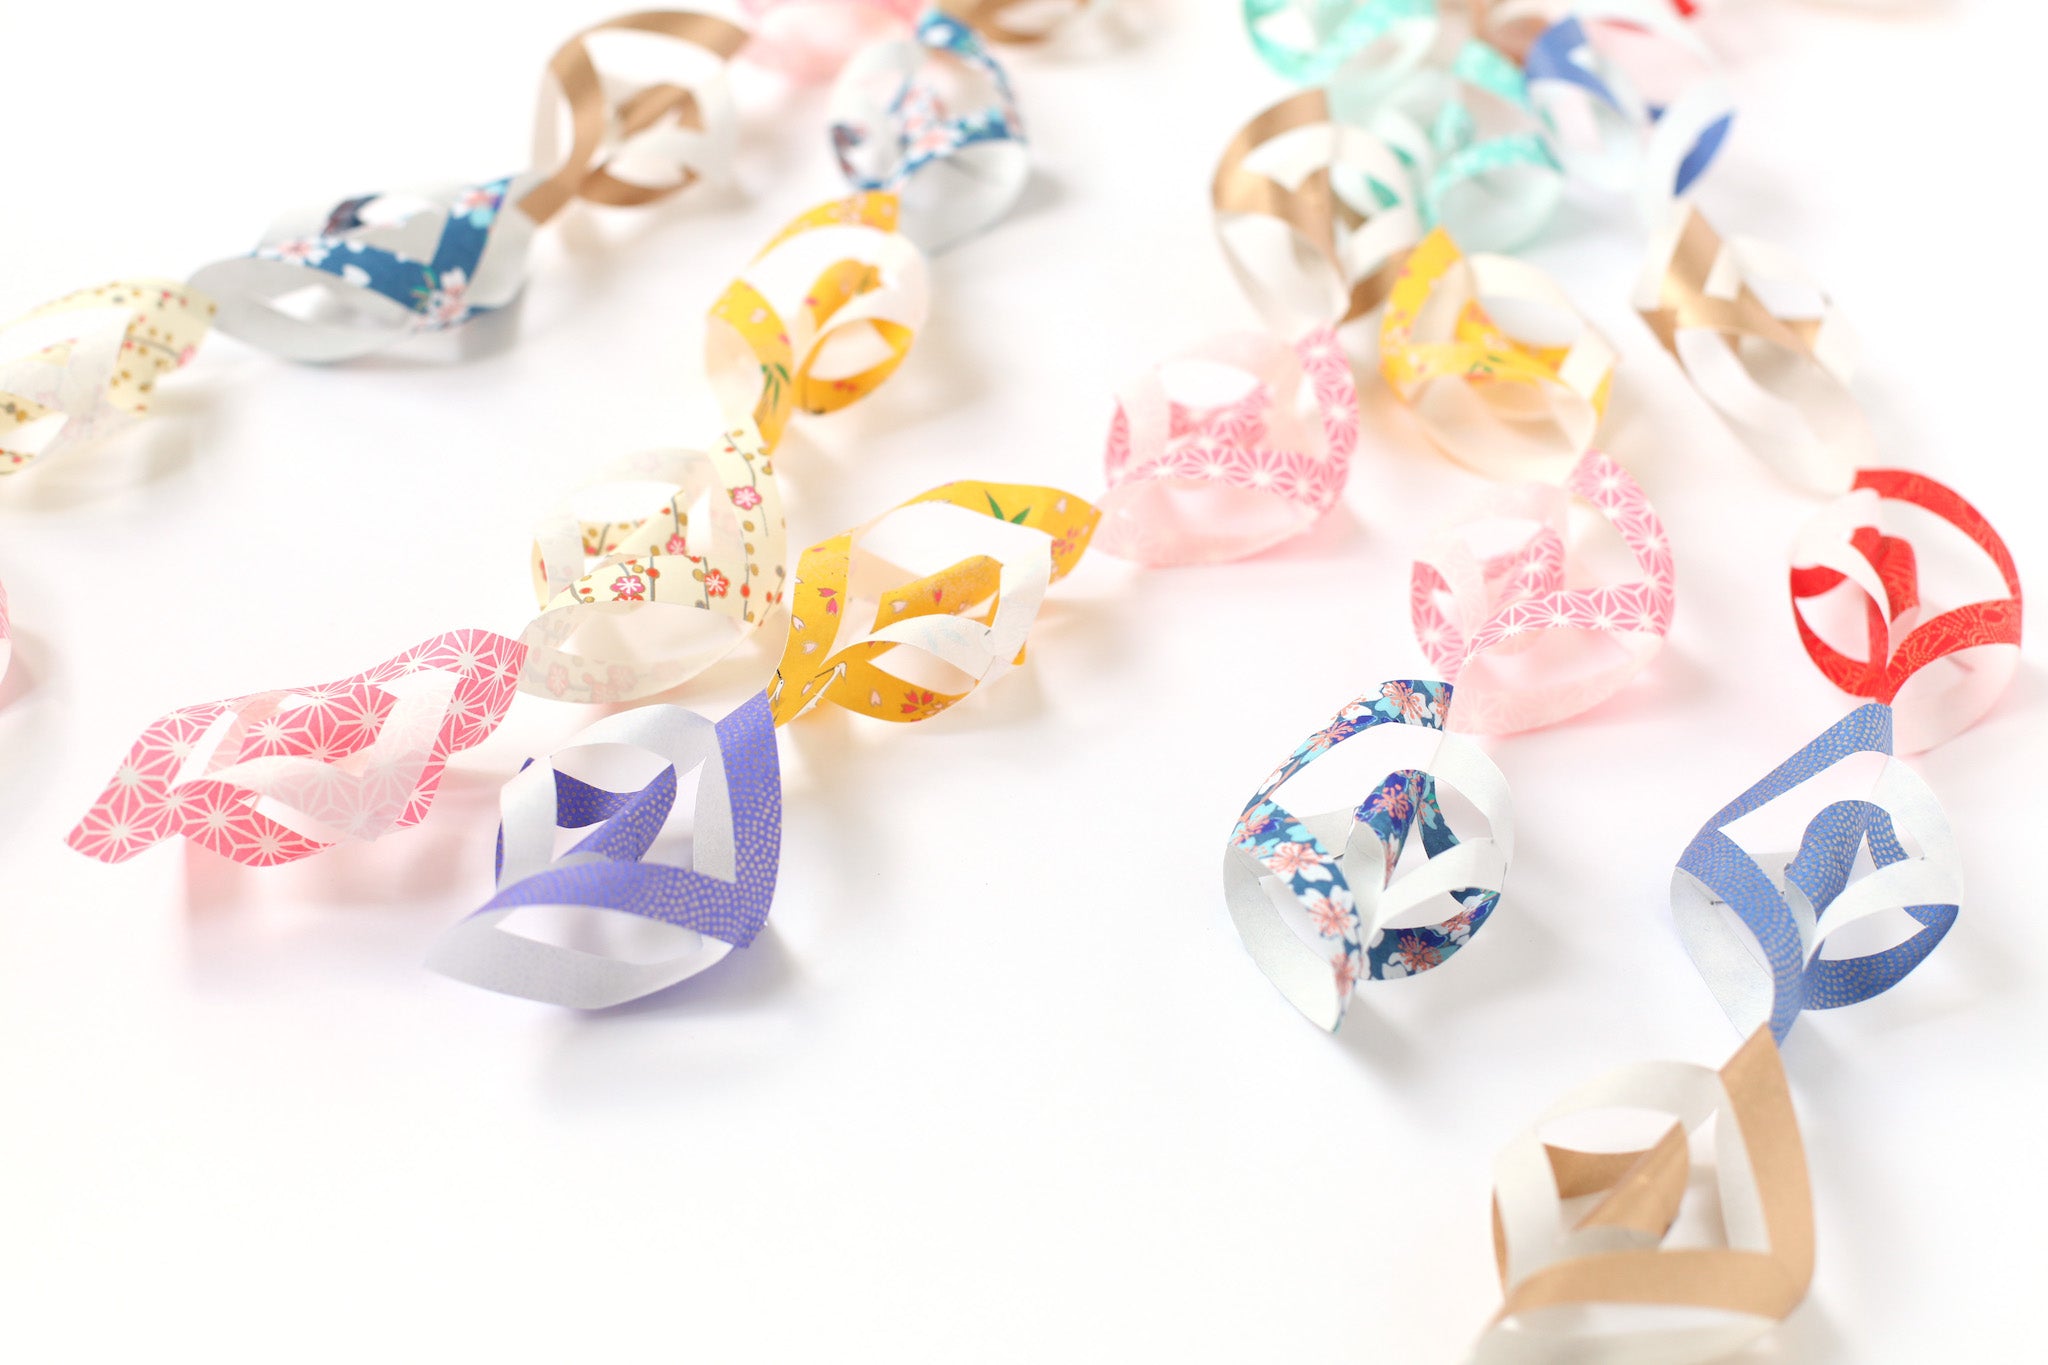
THE VOLUTES / KAITSUZURI
In order to make an origami Tanabata volute, you will need:
-
1 square of origami paper measuring 7.5cm per side - Here we used a square of origami paper measuring 15cm per side which we cut into 4 smaller squares measuring 7.5cm per side. For these Tanabata tutorials, you can use sets of 15cm square origami papers in shimmering colors!
- a pair of scissors or a cutter
-
a pencil
- a little glue
- a graduated ruler

- Take a 7.5cm square of Japanese paper. This can be previously cut into a square with a side of 15cm.
- With the patterned side facing you and point upwards, fold your square in half horizontally to mark one of the middles.
- At 1cm and 2cm from the left and right ends of the fold, draw 4 parallel lines, making sure to stop 0.5cm before drawing your points.
- Cut along the lines drawn previously.
- Rotate your folding 90°, white side and unfolded, towards you.
- Fold the two ends of the first square (the centermost) towards the center of the fold and assemble them together using a bit of glue.
- Turn your fold over, patterned side facing you.
- Fold the two ends of the second square towards the center of the fold and assemble them together using a bit of glue.
- Turn your fold over, white side towards you.
- Fold the two ends of the third square towards the center of the fold and assemble them together using a bit of glue.
- Repeat the previous steps according to the number of scrolls desired.
TADA! Your scroll is finished!
--------------------
THE GARLAND OF CUT SQUARE / HISHIGATA TSUZURI
In order to make your garland of cut out origami Tanabata squares, you will need:
- 2 squares of origami paper measuring 15cm on a side - For these Tanabata tutorials, you can use sets of origami paper measuring 15cm on a side in shimmering colors!
- a pair of scissors or a cutter
- a pencil
- a graduated ruler

- Take a 15cm square of Japanese paper, colored side towards you.
- Fold your square in half horizontally.
- Draw 4 triangles following the marks in the photo. Attention ! The 3 centralmost triangles are not finished.
-
Cut using a pair of scissors or a cutter along the lines drawn previously.

- Grab the center square and start unfolding your fold.
- Do the same even with the second square...
- Then the third and so on.
TADA! Your cut-out square garland is finished!
--------------------
THE SHELL / KAIKAZARI

In order to make your origami Tanabata shell, you will need:
- 2 squares of origami paper measuring 15cm on a side - For these Tanabata tutorials, you can use sets of origami paper measuring 15cm on a side in shimmering colors!
- a cutter
- a little of glue
- a graduated ruler
-
a pencil
- Take a 15cm square of Japanese paper.
- With the white side facing you, draw a square with a side of 11cm 2cm from the edge of your paper, then trace 10 vertical lines every 1cm inside your drawn square.
- Cut out, using a cutter and the ruler, the 13 vertical lines that make up your square and mark the central fold.
- Unfold your square.

- Grab the bottom left and top right ends of your square.
- Fold them towards the center of the fold to make them join and glue them together using a bit of glue.
- Repeat the previous steps to make the desired number of shells.
TADA! Your shell is finished!
--------------------
THE GARLAND OF SMALL SQUARES / HISHIGATA KAZARI 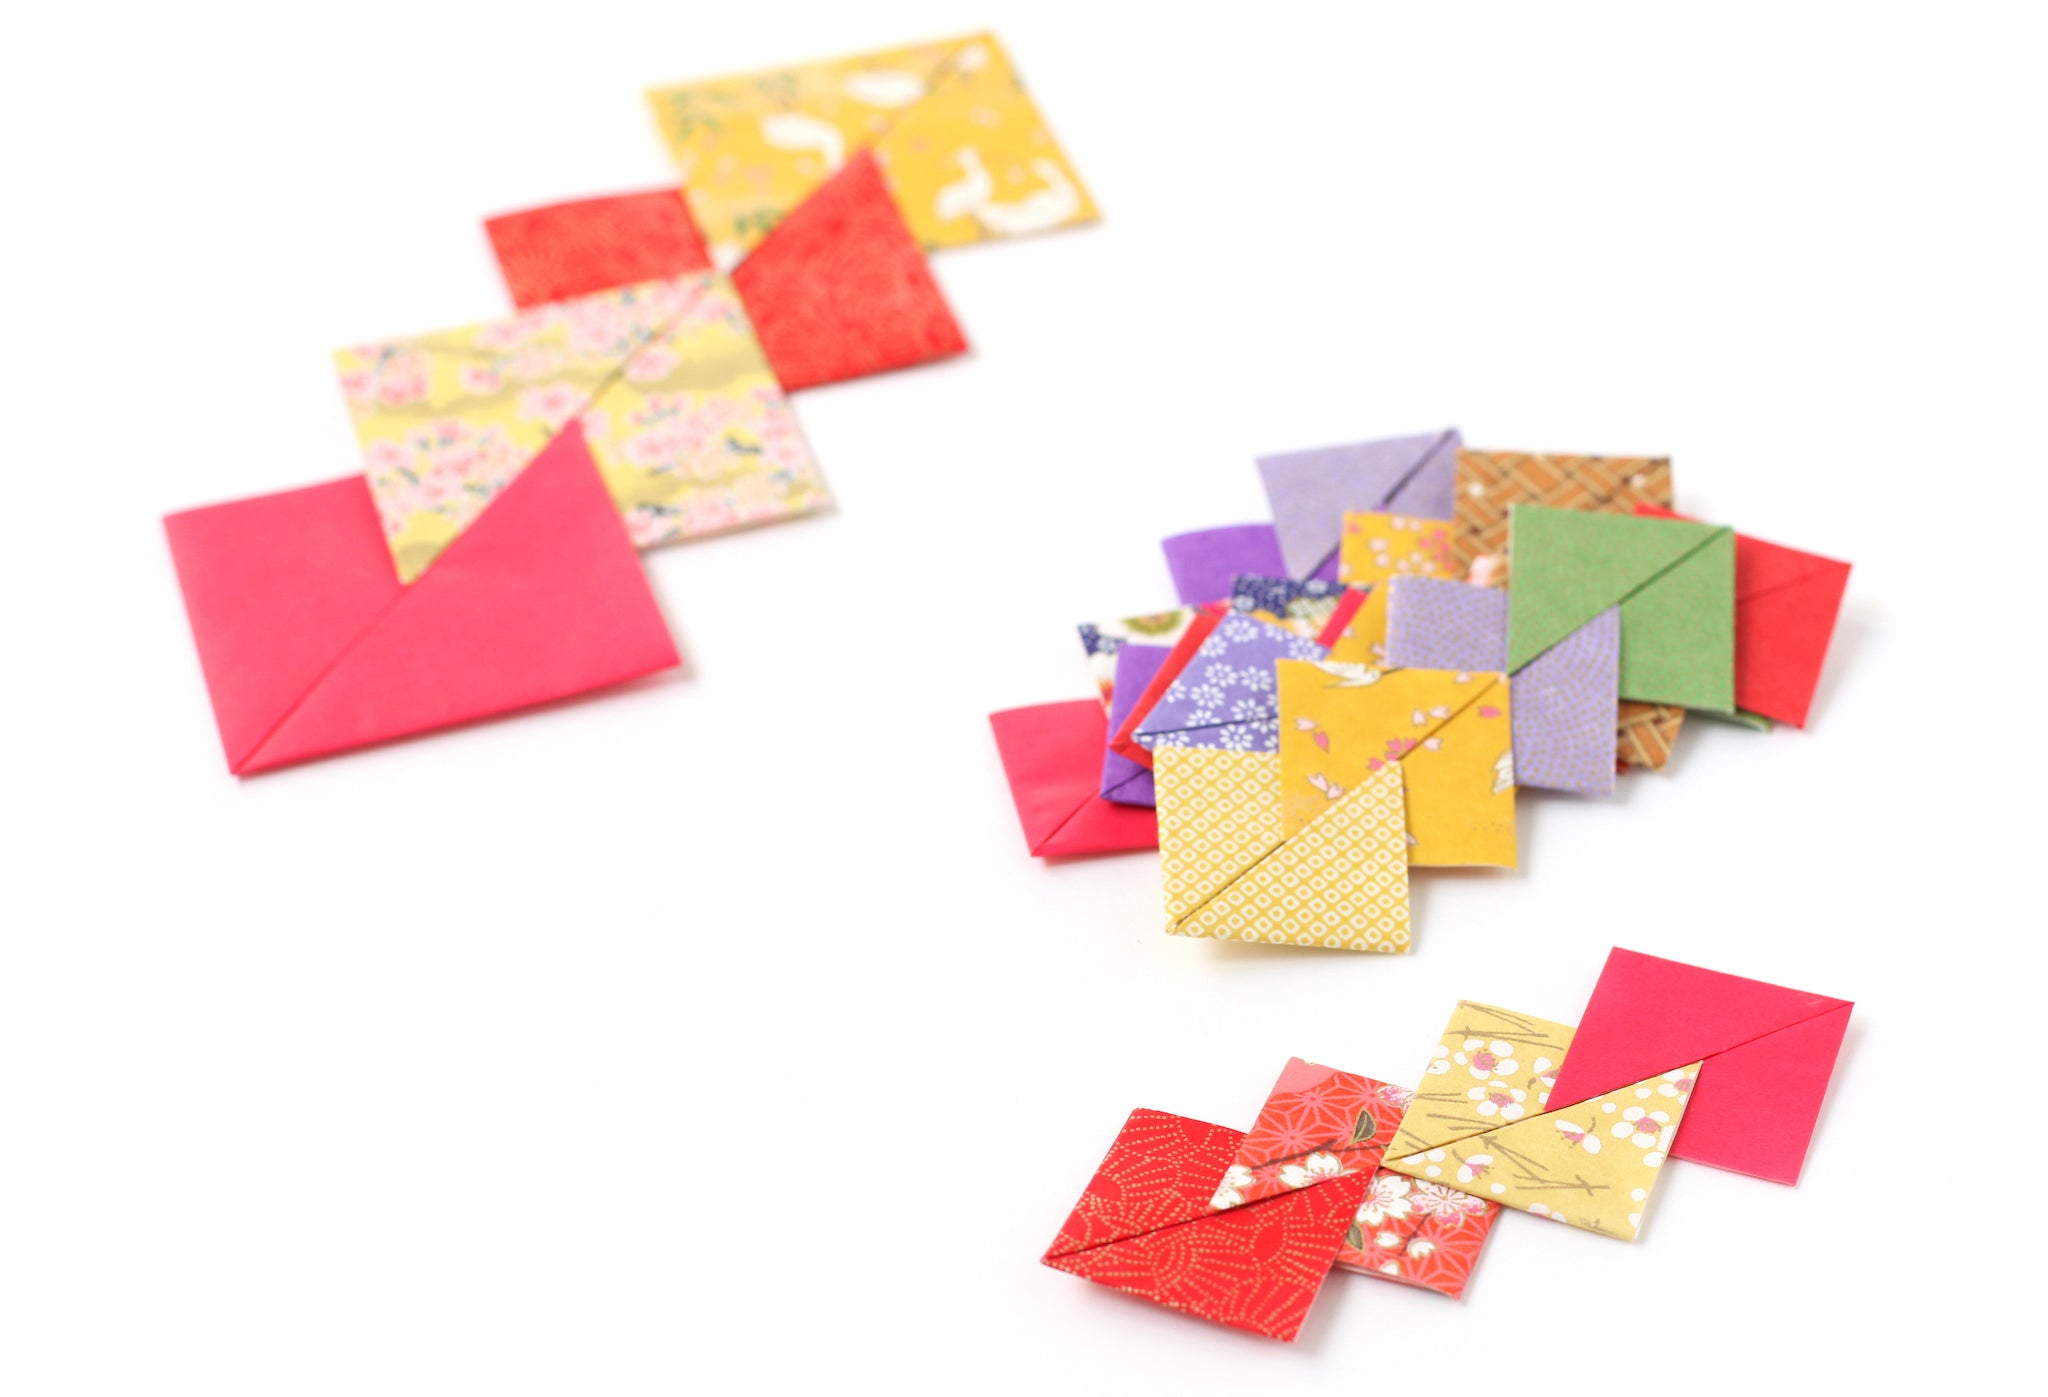
To make your garland of small origami Tanabata squares, you will need:
- 4 squares of origami paper measuring 6cm on a side - For these Tanabata tutorials, you can use sets of origami paper measuring 6cm on a side in shimmering colors!
- a little of glue

- Take a 6cm square of Japanese paper, white side towards you and point upwards.
- Fold your square in half vertically to mark one of the medians.
- Fold the upper point of your fold towards the center of the medial.
- Fold the left tip to the right, stopping at the center of your fold.
- Fold the right tip to the left, stopping at the center of your fold.
You get this. - Repeat this folding to reach the desired number of squares. Grasp the upper point of one of the squares and the lower point of another square and assemble them together until the center of the two folds meets.
- Complete with a dab of glue to hold the squares together.
- Repeat this folding to reach the desired number of squares. Two by two, assemble the small squares as indicated in steps 6 and 7.
- And so on ...
TADA! Your garland of small squares is finished!

I hope these Tanabata tutorials have made you want to make pretty summer decorations! Have a great creative summer!
See you soon,
Adeline


GUALTIERI : Oui ! C’est une fête pleine de poésie ! Merci pour votre petit mot :)
Une note poétique, une fête venue d’ailleurs !
Merci
ANGEL : Merci à vous pour votre petit mot ! N’hésitez pas à nous partager des photos de vos créations ! Belles réalisations à vous en attendant :)
Merci merci on va bien s’amuser avec les enfants on va pouvoir décorer cette année l’an dernier on l’a manquer
AMANDRY ANNE MARIE : Merci à vous pour votre petit mot ! Nous espérons que ces tutoriels vous inspirent plein de projets créatifs :)
Leave a comment