


TUTORIAL The Origami Module
This month, I'm teaching you how to make small 3D origami modules . The folding is very simple, the assembly part requires a little more concentration, but as usual, nothing insurmountable! :) You can have fun making this module in several dimensions and in several colors to decorate your home: as a festive interior decoration, to complete a gift package or to hang on your Christmas tree. In my apartment, I simply like hanging them on my door handles! They add a little cheerful and colorful touch.

To make this folding tutorial very simple, we deliberately chose three colors to clearly break down the steps. I strongly invite you to do the same for your first attempts. Here, the size of the paper is 6x6 cm. You will need a total of 12 squares of Japanese origami paper.
Up to you !
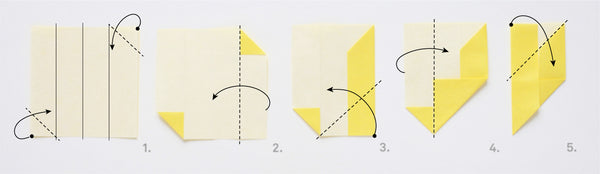
- Mark the central fold then the 2 central folds on the left side and the right side. Fold the 2 ends, taking note of your previous folds.
- Fold over your right part by aligning yourself with the central line according to the dotted lines.
- Fold the large tip along the dotted lines.
- Fold your left part over the central line according to the dotted lines.
- Fold over according to the dotted lines.
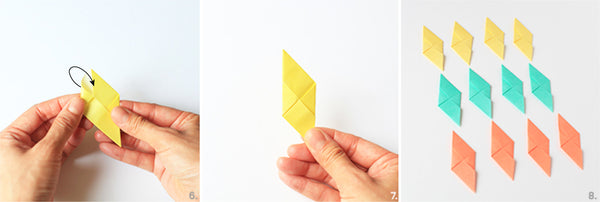
- Slide the fold under the figure.
- You obtain a first diamond.
- Make 11 other diamonds using the step-by-step method (steps 1 to 7).
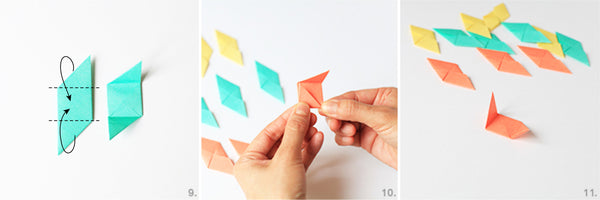
- Turn your diamond over and mark the folds along the dotted lines.
- Make these folds on all your other diamonds.
- You then obtain 12 identical diamonds.

- To make the assembly understandable and easier for the first time, I suggest you focus on 3 diamonds of 3 different colors.

- Take your yellow diamond and your green diamond.
- Slide the green diamond into the yellow diamond.
- Slide the orange diamond into the green/yellow shape.
- You get this shape.
- Repeat this operation (step 13 to 16) to obtain 4 shapes.
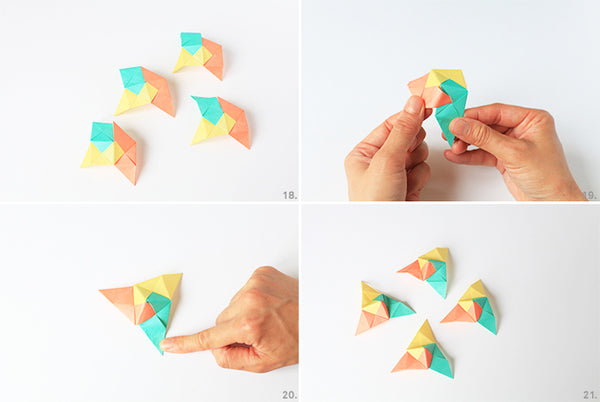
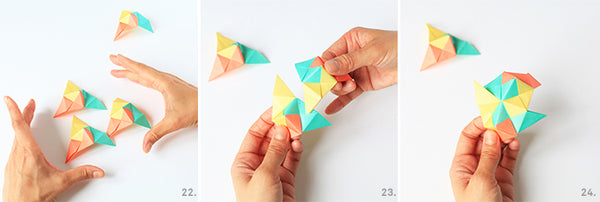
- Take one of your 4 shapes.
- Nest the orange tip into the green fold.
- You get this pyramid shape in 3 colors (orange, green, yellow).
- Repeat these operations (steps 17 to 19) on the other 3 shapes.
- Focus on 3 pyramid shapes to interlock.
- Nest one shape inside another as precisely shown in the image.
- You get this shape.
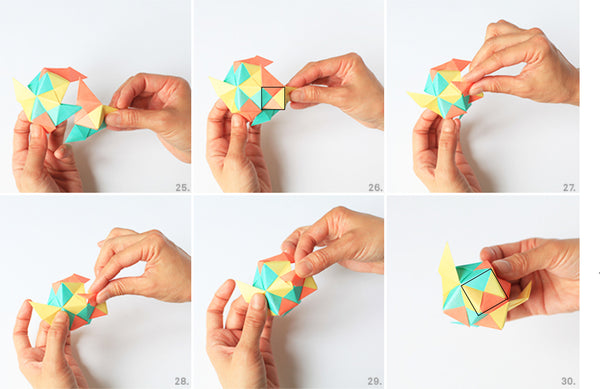
- Nest the green tip of the large shape into the 3rd pyramid shape.
- You obtain the square face (shown by the black square). Attention ! Note that we always assemble a trio of colors and never the same color in each other.
- 28. 29. 30. Nest the orange tip to get a square face like this.


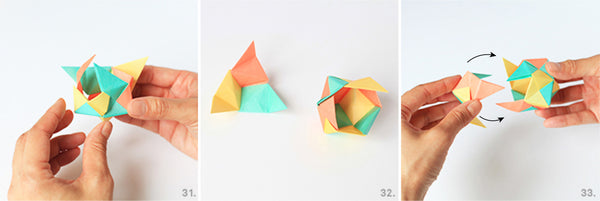
31. This first form is ready.
32. It remains to assemble the last pyramid shape, like a lid.
33. Place your hands like this.
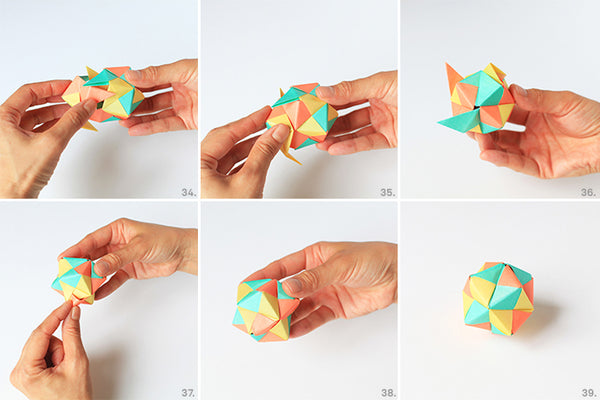
34. 35. Nest the 2 shapes by sliding the two orange tips into the large shape. In the image, the orange nesting tip therefore completes the “yellow and green” area.
36. You obtain a ball with a few pieces of paper that still need to be nested.
37. 38. 39. Finish nesting the tips to obtain your final origami module... Bravo!
If you are unsure about which colors to assemble, here are some examples of ranges designed specifically to help you:

Our 6x6 cm origami paper sets are perfect for this creation.
See you soon for new creative ideas!
Adeline


PASCAL > C’est pour cette raison que nous avons détaillé au maximum les différentes étapes de ce pliage :)
BOLLIER > Merci beaucoup pour votre commentaire :) Nous sommes ravis de savoir que ce pliage vous a plu et qu’il a été simple à réaliser pour vous (malgré ses nombreuses étapes) ! Nous veillons toujours à ce que nos explications soient les plus claires possible.
j’ai beaucoup aimer faire ce module et les images et les explications m’ont beaucoup aider à monter ce module, merci c’était très bien expliquer !
Pas facile de repérer le 3D sur une image de montage!!
Leave a comment